FizzBuzz the ROS2 way
Table of Contents
1. Overview
In this tutorial you will create a version of the classic FizzBuzz programming exercise using ROS2 Galactic and Python 3.
This tutorial is meant to be interactive, so the code on this page will not work by itself.
You will have to make some changes and complete the parts labeled TODO.
If you run into problems or get stuck, a completed version of the code is available at https://github.com/ericboehlke/ros_fizzbuzz
If you find errors in this document you can also submit bug reports on that repository.
1.1. You will
- Create a ROS2 workspace
- Create a package in your workspace
- Make a Number Publisher Node
- Make a FizzBuzz Node
- Create your own ROS2 message type
- Create a Launch File to run both of these nodes
- Examine the node structure with rqt
1.2. Prerequisites
- If you haven't already, you will need to install ROS2 Galactic. Here is a link for instructions on how to install ROS2: https://docs.ros.org/en/galactic/Installation/Ubuntu-Install-Debians.html.
2. Creating a Workspace
To start working with ROS2 you will need a workspace.
To create one you can run the following command. It will make a workspace in your home (~) directory
called ros2_ws and a src directory inside the workspace where your packages will go.
For more information on setting up a workspace see this tutorial: https://docs.ros.org/en/galactic/Tutorials/Workspace/Creating-A-Workspace.html.
mkdir -p ~/ros2_ws/src
3. Creating a Package
For more information regarding ROS2 packages, see this tutorial: https://docs.ros.org/en/galactic/Tutorials/Creating-Your-First-ROS2-Package.html.
3.1. Making the fizzbuzz Package
In this tutorial you are going to make a CMake package. This will allow you to write nodes in both python and c++ and create custom ROS2 message types. There is an option to create a python only package as well, however python packages cannot contain custom ROS2 messages. The ROS2 tutorial linked above has more information about that.
The first step is to create a new package in your workspace.
Navigate to the src directory in your catkin workspace and create a package named fizzbuzz with dependencies of std_msgs and rclpy.
cd ~/ros2_ws/src
ros2 pkg create --build-type ament_cmake fizzbuzz --dependencies std_msgs rclpy
Now you will have a directory named fizzbuzz inside your src directory that contains the following files.
$ tree ~/ros2_ws/src/fizzbuzz
.
├── CMakeLists.txt
├── include
│   └── fizzbuzz
├── package.xml
└── src

3 directories, 2 files
We also need a to create a directory for the python files we will make in the following steps.
Create a directory named fizzbuzz with an empty file named __init__.py inside.
cd ~/ros2_ws/src/fizzbuzz
mkdir fizzbuzz
touch fizzbuzz/__init__.py
Now your package should look like this.
$ tree ~/ros2_ws/src/fizzbuzz
.
├── CMakeLists.txt
├── fizzbuzz
│   └── __init__.py
├── include
│   └── fizzbuzz
├── package.xml
└── src

4 directories, 3 files
3.2. Compiling the fizzbuzz Package
Now that we have a package, we can compile it to see if we created the package and workspace correctly. To compile the packages in the workspace first make sure that your ROS2 installation's setup file is sourced. You will need to make sure the setup file is sourced in every terminal in which you wish to use ROS2. This command will source that file.
source /opt/ros/galactic/setup.bash
You can automatically source this file in every new terminal by adding this line to your ~/.bashrc file.
That can be accomplished by running this command.
echo "source /opt/ros/galactic/setup.bash" >> ~/.bashrc
Now that ROS2 is set up in the current terminal you can to navigate to the top of your workspace and run colcon build.
cd ~/ros2_ws
colcon build
If everything worked the output from colcon build will look something like this below and you will have 3 new directories
in the root of your workspace named build, log, and install.
$ colcon build
Starting >>> fizzbuzz
Finished <<< fizzbuzz [0.19s]

Summary: 1 package finished [0.31s]
4. Number Publisher Node
Now that we have a package, it is time to create a node that publishes numbers that we can use to play the FizzBuzz game. More information on creating ROS2 nodes in python can be found here: https://docs.ros.org/en/galactic/Tutorials/Writing-A-Simple-Py-Publisher-And-Subscriber.html.
4.1. Starting off with a Minimal Publisher
4.1.1. Code
The number publisher node will live in the fizzbuzz folder inside the fizzbuzz package we made in the last section.
Now we will start creating the number publishing node called number_publisher_node.py.
Here is a minimal publisher node template from the ROS2 python node tutorial that we can use as a starting point.
Create a new file at the path ~/ros2_ws/src/fizzbuzz/fizzbuzz/number_publisher_node.py and paste in the following code.
Super important note: If you want to run python files in a CMake package, make sure you add a shebang otherwise you will get an error when you try to run the node.
#!/usr/bin/env python3

import rclpy
from rclpy.node import Node

from std_msgs.msg import String

class MinimalPublisher(Node):

    def __init__(self):
        super().__init__('minimal_publisher')
        self.publisher_ = self.create_publisher(String, 'topic', 10)
        timer_period = 0.5  # seconds
        self.timer = self.create_timer(timer_period, self.timer_callback)
        self.i = 0

    def timer_callback(self):
        msg = String()
        msg.data = 'Hello World: %d' % self.i
        self.publisher_.publish(msg)
        self.get_logger().info('Publishing: "%s"' % msg.data)
        self.i += 1


def main(args=None):
    rclpy.init(args=args)

    minimal_publisher = MinimalPublisher()

    rclpy.spin(minimal_publisher)

    # Destroy the node explicitly
    # (optional - otherwise it will be done automatically
    # when the garbage collector destroys the node object)
    minimal_publisher.destroy_node()
    rclpy.shutdown()


if __name__ == '__main__':
    main()
4.1.2. Explaination
The python file can be broken down into four parts.
- The imports at the top of the file
- The node class
- The main function
- And the if statement at the bottom.
- Imports
The two imports here are
rclpyand theStringmessage type from thestd_msgsROS2 package. - The MinimalPublisher Class
This class has two functions inside.
The
__init__function runs just once when an instance of the class is created. It first prints a log message to say that the node is starting. This is not necessary to the function of the node and just serves as a helpful way to see when the node starts.Next a publisher is created with
self.create_publisher(). This function has 3 arguments. The first is the message type. In this case the node publishes strings so theStringtype is used. The second is the name of the topic that the publisher is publishing to. In this case it is boringly namedtopic. The final argument is the queue size and determines how many messages the publisher keeps around in case the subscribers are not receiving them fast enough. Ten is a good number.Finally a timer is created with
self.create_timer(). This timer calls theself.timer_callbackfunction with a period between calls of 0.5 seconds.The
timer_callbackfunction does the work of publishing the messages. When it is called it creates a string that says "Hello World" and starts counting up with each created message. Then it publishes the string withself.publisher.publish()and prints out a log statement with the current counter value. - The main function
The main function first initializes the
rclpylibrary and then callsrclpy.spin()which keeps the nodes running and makes sure all the timers, publishers, and subscribers in a node work properly. When the program is told to stop, the node is destroyed andrclpyis shutdown. - The If Statement
if __name__ == '__main__':
    main()
If you have never seen this syntax before it is a way to only run code if the python file is run directly and not if it has been imported into another file. In this case it just calls the main function.
4.2. Start Counting!
Right now this minimal publisher node publishes strings instead of numbers. We need to customize the example to our use case.
4.2.1. Rename the Node
First let's change all the places where it says MinimalPublisher or minimal_publisher to NumberPublisher or number_publisher respectively.
Make sure you change the name in the super().__init__ function call as well. This function lets the rest of ROS know what the node's name is.
4.2.2. Change the Message Type
Right now the message being used is the std_msgs/String message. For the
number publisher we want to publish integers. Find the appropriate message
type to replace with String. The list of all of the messages in std_msgs can be found here.
Make sure to replace the message type in the import, where the publisher is created, and in the callback.
Rename the topic from topic to something more descriptive such as numbers.
4.2.3. Make it Count!
Now the node is nearly all set up to publish integers instead of strings. All that is left is to change the callback function to make that happen. Your mission, should you choose to accept it, is to publish integers starting at 0 and increasing by 1 every message.
4.3. Adding the Node to the Build.
To compile our node we need to let the colcon build tool know that it exists.
To do that we need to add some lines to CMakeLists.txt and package.xml.
Add the following line to package.xml.
<buildtool_depend>ament_cmake_python</buildtool_depend>
Then in CMakeLists.txt, we need to add the ament_cmake_python package to the build so we can build python files.
find_package(ament_cmake_python REQUIRED)
And add this block to CMakeLists.txt as well to tell colcon where the python file with our number publisher is located.
ament_python_install_package(${PROJECT_NAME})

install(PROGRAMS
  fizzbuzz/number_publisher_node.py
  DESTINATION lib/${PROJECT_NAME}
)
5. Testing the Number Publisher Node
Now it is time to see your hard work in action. Lets test the number publisher node to make sure it is functioning properly.
First you will have to build your package again.
To do this source your workspace setup file, which was created in the install directory last time we ran colcon build,
and run colcon build from the root of your workspace.
cd ~/ros2_ws
source install/setup.bash
colcon build
Step two is to open an additional terminal window.
Remember to run source install/setup.bash in the new one as well.
You can use whatever termainal emulator you want but I recommend tmux or terminator.
One of these programs will allow you to easiy see everything that is
going on without windows overlapping or having to switch between tabs.
Step three is to start our number publisher node in either terminal. For this you can use the ros2 run [package_name] [node_name] command.
ros2 run fizzbuzz number_publisher_node.py
Step four is to set up the other terminal window to listen to a topic and print all
of the messages it recieves to the terminal. This way we can make sure that
the node is publishing correctly. The following command does exactly that:
ros2 topic echo [topic_name]. Note that you will get a warning saying that the topic
has not been published yet. That is to be expected and we will fix that next.
ros2 topic echo numbers
Now you should see numbers counting up from the terminal running ros2 topic echo.
That terminal is subscribed to the messages published by the number_publisher_node and prints them out to the screen.
You can use ^C (Ctrl-C) to stop the processes in either terminal whenever you are done.
6. FizzBuzz Node
Now we are on to the FizzBuzz node. This node will subscribe to the numbers
topic that we made in the last section and will publish its own topic named
fizzbuzz. This topic will transport custom messages containing the result
of the FizzBuzz function for the current number, the ratio of
fizz, buzz, and fizzbuzz to the total number of messages received since
the node has started, as well as the count of how many messages have been recived by the node.
6.1. Creating a FizzBuzz Message
Our custom fizzbuzz message will look like this.
string fizzbuzz  # the result of the fizzbuzz function
float32 fizz_ratio  # the ratio of fizz results to non fizz results
float32 buzz_ratio  # the ratio of buzz results to non buzz results
float32 fizzbuzz_ratio  # the ratio of fizzbuzz results to non fizzbuzz results
int32 number_total  # the total number of numbers received.
The string fizzbuzz will either be fizz if the number is divisible by
3, buzz if the number is divisible by 5, fizzbuzz if the number is
divisible by 15, or an empty string if none of the previous cases are true.
To create this new message type in ROS, we will have to make a file named
FizzBuzz.msg in a new folder named msg within the fizzbuzz package.
Then paste the message content above into the new file.
mkdir -p ~/ros2_ws/src/fizzbuzz/msg
cd ~/ros2/src/fizzbuzz/msg
touch FizzBuzz.msg
Now that you have a new message file you need to add it to the build.
To do this you will have to edit the file CMakeLists.txt as well as package.xml in the package.
Add the following to your CMakeLists.txt.
find_package(rosidl_default_generators REQUIRED)

rosidl_generate_interfaces(${PROJECT_NAME}
  msg/FizzBuzz.msg
)
And these lines to your package.xml.
<build_depend>rosidl_default_generators</build_depend>

<exec_depend>rosidl_default_runtime</exec_depend>

<member_of_group>rosidl_interface_packages</member_of_group>
After you have updated those two files, you will need to run colcon build to build the message.
It is also good to source in the workspace setup file again whenever a new message or node is created
cd ~/ros2_ws
colcon build
source install/setup.bash
If everything worked correctly, you should be able to use ros2 interface show <package>/msg/<message_name>
to see the contents of your new FizzBuzz message.
ros2 interface show fizzbuzz/msg/FizzBuzz
6.2. FizzBuzz Node
6.2.1. Code
The FizzBuzz node will also live in the fizzbuzz folder. Create a new file
named fizzbuzz_node.py. Here is some code to get you started.
#!/usr/bin/env python3

import rclpy
from rclpy.node import Node

# import our new fizzbuzz message type
from fizzbuzz.msg import FizzBuzz

# TODO import the number message used for the numbers topic

class FizzBuzzNode(Node):
    def __init__(self):
        super().__init__('fizzbuzz')
        self.get_logger().info("Starting fizzbuzz node")

        self.total_numbers = 0
        self.total_fizz = 0
        self.total_buzz = 0
        self.total_fizzbuzz = 0

        # create a publisher object to send data
        self.fizzbuzz_pub = self.create_publisher(FizzBuzz, "fizzbuzz_stats", 10)

        # TODO fill in the TOPIC_NAME and MESSAGE_TYPE
        self.number_sub = self.create_subscription(MESSAGE_TYPE, "TOPIC_NAME", self.number_callback, 10)

    def number_callback(self, msg):
        # this function is called whenever a number is recived.

        number = msg.data

        fizzbuzz_str = self.fizzbuzz(number)
        # loginfo to print the string to the terminal
        self.get_logger().info(fizzbuzz_str)

        fizzbuzz_msg = FizzBuzz()
        fizzbuzz_msg.fizzbuzz = fizzbuzz_str
        fizzbuzz_msg.fizz_ratio = 0 # TODO fill in this value
        fizzbuzz_msg.buzz_ratio = 0 # TODO fill in this value
        fizzbuzz_msg.fizzbuzz_ratio = 0 # TODO fill in this value
        fizzbuzz_msg.number_total = 0 # TODO fill in this value

        # publish the message
        self.fizzbuzz_pub.publish(fizzbuzz_msg)

    def fizzbuzz(self, number):
        # TODO complete this function
        # This should return a string equal to:
        #      "fizz" if number divisible my 3
        #      "buzz" if number divisible my 5
        #      "fizzbuzz" if number divisible my 15
        #      an empty string otherwise
        return ""


if __name__ == "__main__":
    rclpy.init()
    node = FizzBuzzNode()
    rclpy.spin(node)
    node.destroy_node()
    rclpy.shutdown()
6.2.2. Explaination
At the top of the file we import the FizzBuzz message we just created.
The __init__ function first initializes a couple variables that might be
helpful for completing the node. Then, it
creates a publisher object that publishes FizzBuzz messages to a topic
named fizzbuzz_stats.
Next it subscribes to a topic. It is your job to fill in both the topic
name and the message type. When a new message is recived, it calls the
number_callback function. In this way, it is similar to how the timer
called the timer_callback function.
The number_callback function takes in the message recieved by the
subscriber and publishes a FizzBuzz message with the correct information.
To accomplish this it uses a function called self.fizzbuzz that returns a
string containing the correct response for that number.
6.2.3. Complete the Node
If you complete the code in the places marked by TODO, you will have a functioning FizzBuzz Node.
Make sure you add it to the build by specifiying the new file in CMakeLists.txt as well.
7. Testing the FizzBuzz Node
Let's check to make sure the FizzBuzz node is working correctly. Build the package again from the root of the workspace. Open three terminals and run the following commands.
This starts up the FizzBuzz node we just made.
You should see the result of fizzbuzz printed to the terminal whenever this node recives a message from the numbers topic.
ros2 run fizzbuzz fizzbuzz_node.py
This command displays the messages published to the fizzbuzz_stats topic.
You should see the result of FizzBuzz as well as the ratio and total count in this terminal after you start the number publisher.
ros2 topic echo fizzbuzz_stats
When you run this command the number_publisher_node will start publishing numbers and will kick off the whole game of FizzBuzz.
ros2 run fizzbuzz number_publisher_node.py
8. Making a Launch File
That was a lot of terminals we needed to play FizzBuzz! It would be great if there was a way to start multiple ROS nodes with one command. That is where launch files come in.
Launch files are files that contain instructions to run a group of ROS nodes.
We will now make a launch file to start both the number publisher and the fizzbuzz node.
Here is an example launch file that runs the number_publisher_node.py.
You can copy the format to make it launch the fizzbuzz node as well.
Launch files go in a directory called launch in the package to which they belong.
You can name the new launch file fizzbuzz_launch.py and put it in a new folder at fizzbuzz/launch.
from launch import LaunchDescription
from launch_ros.actions import Node

def generate_launch_description():
    number_publisher_node = Node(
            package='fizzbuzz',
            executable='number_publisher_node.py',
            output='screen'
        )

    return LaunchDescription([number_publisher_node])
As you can see, we need to specify the package of the node and the filename of the node in order to properly start the node from a launch file.
The output attribute specifies where the messages from the ROS log command get sent.
By specifying the value screen they will appear in the terminal we use to start the launch file.
For more information about the format of a ROS2 launch file, see this page: https://docs.ros.org/en/galactic/Tutorials/Launch/Launch-Main.html
To add the launch file to the build add this to your CMakeLists.txt
install(DIRECTORY
  launch
  DESTINATION share/${PROJECT_NAME}/
)
And this to your package.xml.
<exec_depend>ros2launch</exec_depend>
Run colcon build again and now if we want to play FizzBuzz again we can simply open two terminals and run the following commands.
The ros2 launch command will run the launch file.
ros2 launch fizzbuzz fizzbuzz_launch.py
To see the messages on the fizzbuzz_stats topic, we will still have to use the rostopic echo command.
ros2 topic echo fizzbuzz_stats
9. RQT
RQT is a useful tool to see what nodes are running and how messages are being transfered between them.
Use your launch file to begin a game of FizzBuzz and then open RQT using the following command in a new terminal.
rqt
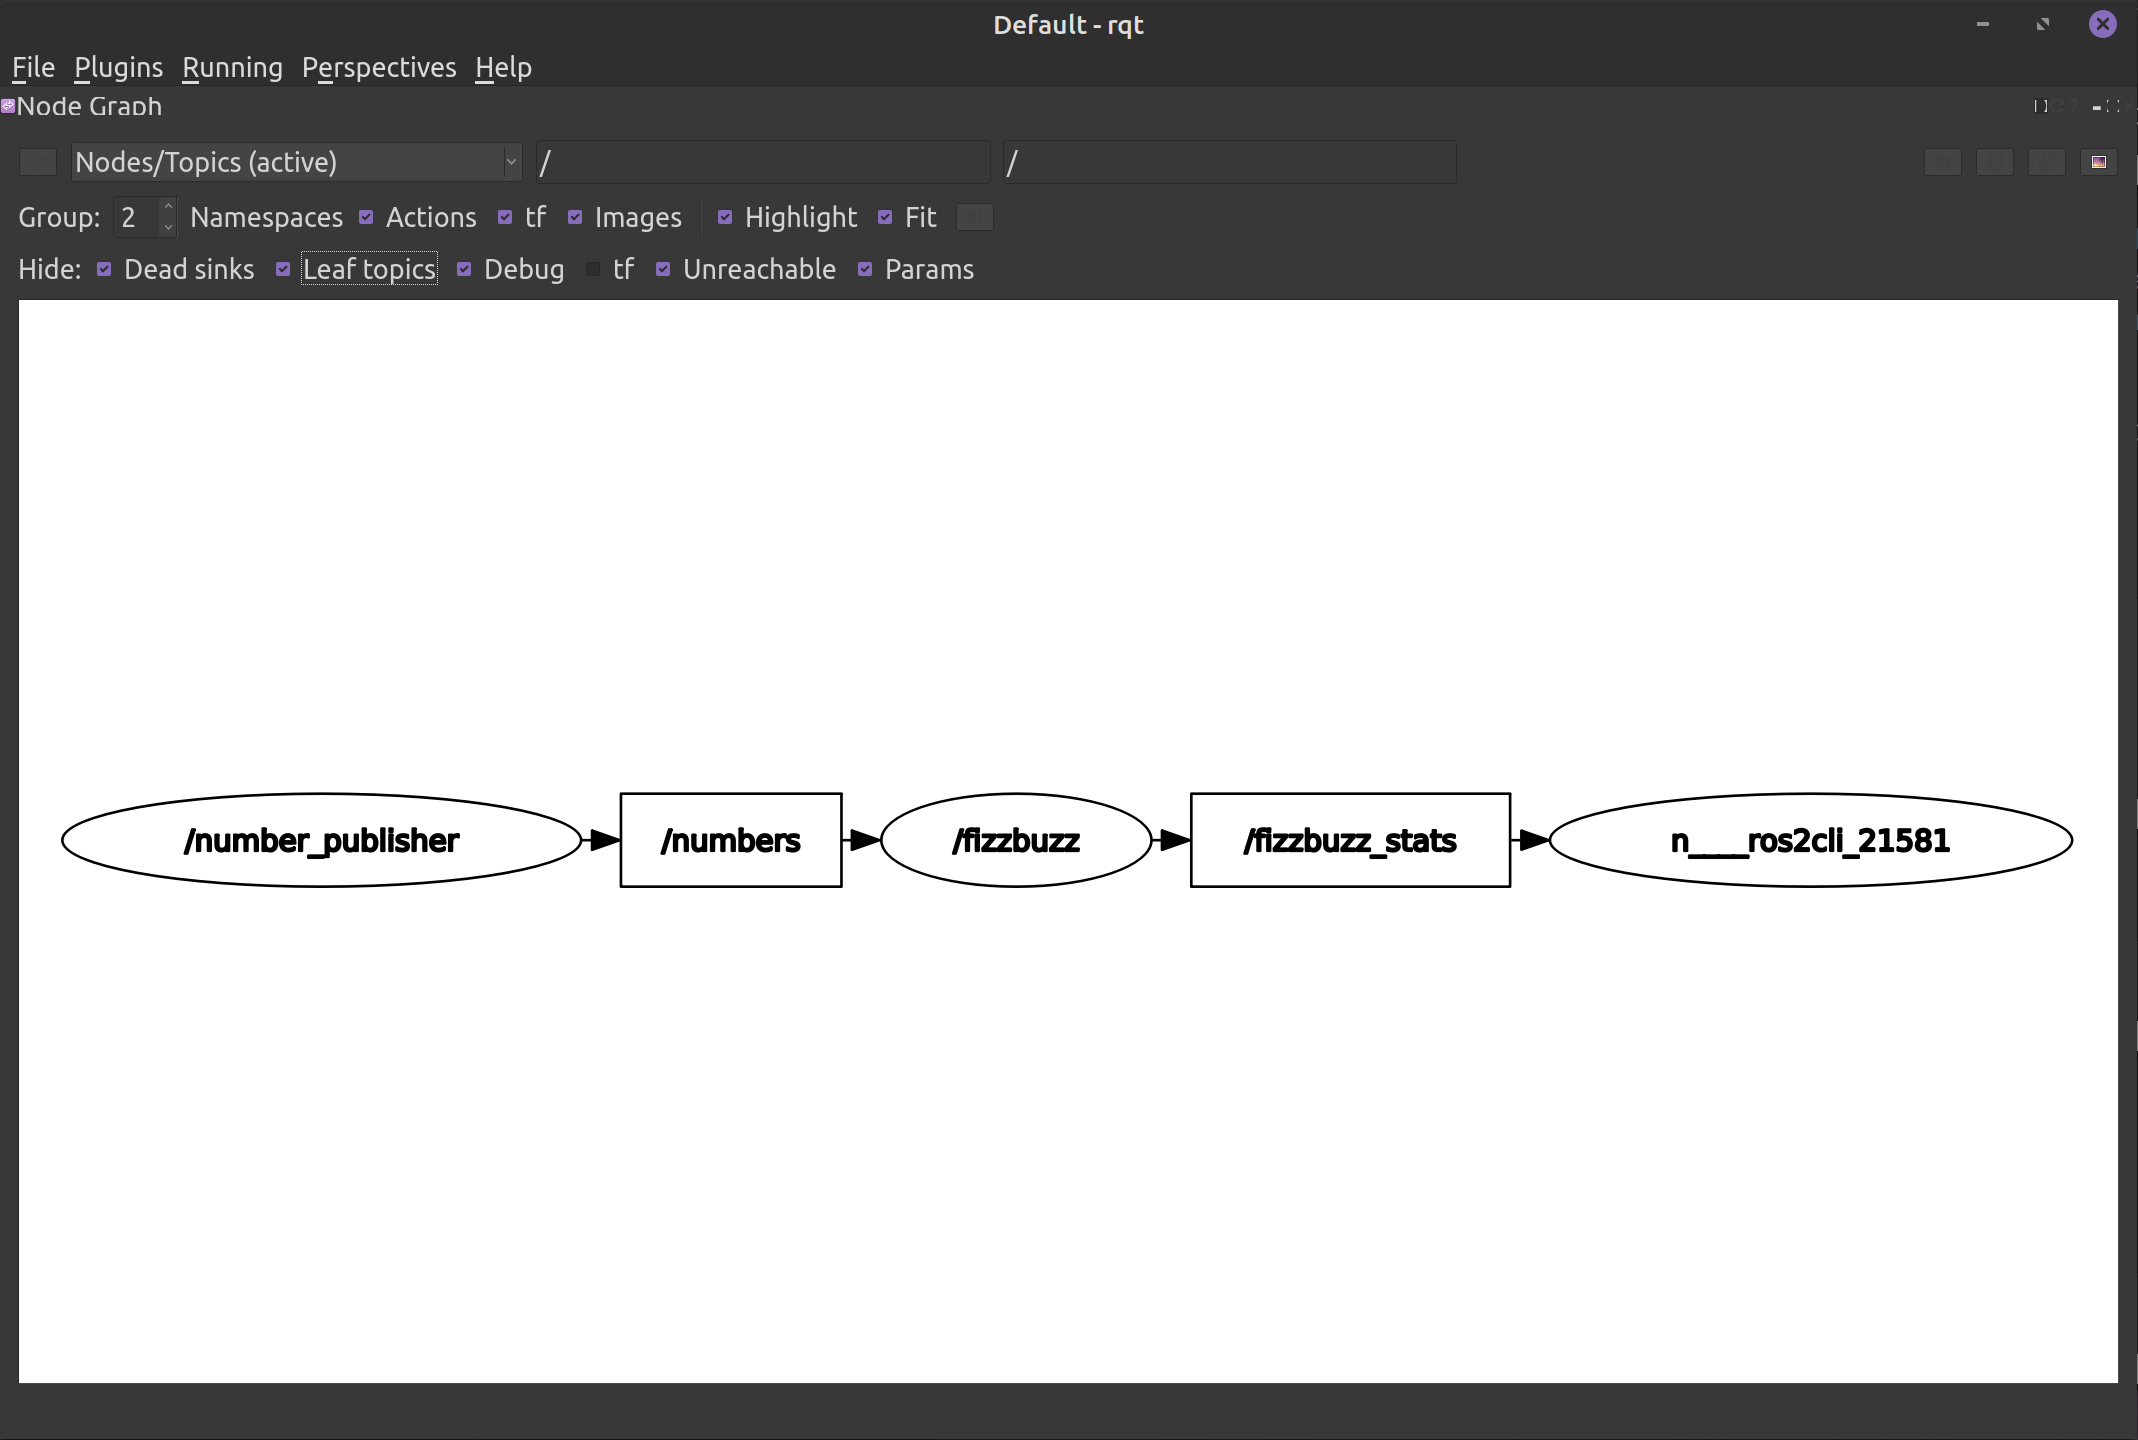
This command will open up an empty window. Navigate in the top menu to Plugins, Introspection,
Node Graph. This will show you all of the currently running ROS nodes as circles and the topics they communicate on as arrows.
For FizzBuzz this graph is only two nodes with a single topic between them, but RQT is very helpful for visualizing the connections in larger
projects. RQT has many other helpful tools for inspecting messages and graphing data that you might want to explore.
ROS2 has many built in tools for seeing what topics being used (ros2 topic list), what nodes are being run (ros2 node list),
recording and playing back messages (ros2 bag), diagnosing problems while ROS2 is running (ros2 wtf), and many more.
10. Keep Exploring!
This tutorial has just scratched the surface of what ROS2 can do. To learn more check out the ROS2 Wiki here: https://docs.ros.org/en/galactic/index.html Hopefully you found this tutorial helpful on your journey of learning ROS2.